Sap’s Rising, or Sugaring: Part 1

Sap flowing

“The sap rises and the angels sigh, yeah … ” -James Taylor

… And then it freezes again because it was just a freak February thaw.

There is a narrow scrim of maple trees across the back of our property, and when we looked at the house in the peak foliage of late fall last year, there were glorious red maple leaves everywhere. Our friends in Falmouth, who are accomplished homesteaders themselves, noticed the leaves and informed us that we had sugar maples! We should tap our trees! I got really excited—We could get some of those adorable maple-leaf-shaped glass jars and give homemade maple syrup for Christmas! This was before I did my research and realized that you need about thirty gallons of sap to make one gallon of maple syrup. At this point, we are hoping to get one quart of maple syrup to enjoy as a family on our pancakes on Sunday mornings over the next few months. So is it worth the effort? I don’t know yet. I’ll let you know when we start boiling the frozen sap in Part II. However, here is what I have learned so far:

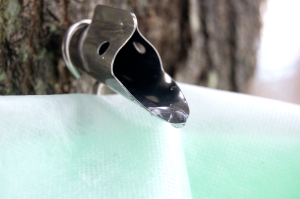
spile

To tap trees, you need a spile. This is a spile. I just like the word spile, so I try to work it into as many sentences as possible. We got a Tap my Trees Spile Kit, which includes four spiles and four hooks. So far we have used one. It works great.

Tree tappin' husband

You need a 7/16th-inch drill bit to drill into the trunk of a sugar maple tree. Drill at an upward angle so that when you insert the spile, the sap flows down. Make sure you clean out the hole before you insert the spile, then hammer the spile securely into the hole immediately. The sap began running the minute we took the drill away from the tree! Fix the hook on the tree side of the spile and place the sap-collecting bag or bucket onto the hook.


sap bucket

This is a two-gallon bucket. There are bucket covers available to prevent debris from falling into the sap, but we eventually just placed a couple layers of cheese cloth over the top of the bucket and secured it with rubber bands—a simpler and less costly solution.

At the end of the first day about a quarter of the bucket was full, and the sap was still running, so we left the bucket out overnight …

and it froze solid.

Of Raised Beds and Menopausal Hens

IMG_20140221_094427     There is at least three feet of snow on the ground, so obviously it’s time to start laying out plans for gardens and a chicken coop. By city ordinance we may keep up to six laying hens. We are starting with fully grown ladies, and if they work out, we’ll get some chicks next year. I will be consulting with Stacey at Backyard Harvest about breeds of laying hens, since apparently hens lay for three or four years and then dry up. Yes, there is such a thing as hen menopause. Henopause. These old gals will be our pets, but the ruthless farmer in me wants to get breeds that lay eggs, but are also good for meat. Stacey will also be helping us with coop design (this one is from Chicken Coops: 45 Building Ideas for Housing Your Flock by Judy Pangman), raised bed construction and placement, and planting. We’ve decided to try and get as much reclaimed and recycled material as possible for the coop, including lumber, roofing and glass. There is a Habitat for Humanity ReStore very near us, so we’re going to visit them regularly to get materials to start building when the snow finally melts in Never. Never is usually some time in March around here. We plan to put the coop against the south-facing side of the garage with a run all the way to the neighbor’s fence. I don’t know if we’ll cover it with chicken wire like this one because I don’t yet know what the predator situation is in our area. The hens will free range it around the raised beds and hopefully dine on our food scraps, then crapping out some good fertilizer and effectively bringing the process full circle. When we lived in Austin, there was a bar up North that regularly held games of Chicken Shit Bingo. I kind of want to mow the lawn into a game board. Anyway, we’re busy brainstorming names and daydreaming about fresh eggs every day. My husband wants to name the hens after the ladies of Downton Abbey. “Oh look, Lady Edith laid an egg with a double yolk!”

As far as the gardens go, we have decided on raised beds so we have more control over the soil. We are going for a 100-percent organic garden. However, with no finished compost ready for this growing season, we are going with seaweed from the local rockbound coast of Maine. I am not sure if that is certified organic. 🙂 That’s another thing we can start doing now: gathering seaweed and drying it in the basement. Our basement is going to smell like dead fish. I can’t wait. We are also ordering our seeds now from Johnny’s this month. So far we have agreed on tomatoes, green beans, broccoli, squash, cucumbers (my son’s preferred green vegetable), carrots, potatoes and beets. I have begun experimenting with canning vegetables we’ve gotten through our co-op in hopes of preserving our own vegetables for consumption through the winter months next year. I’ll post about the process when we have our own food to can!

There are other things in the works, but this is what I’m most excited about today!


Welcome!

Hello there! Welcome to our back-to-the-yard blog. We are Skye, Nate and Alistair, a small family living in the small city of Portland, Maine, on our small plot of land. So why not back to the land then? Because our land is just about 1/5th of an acre. It’s not land. It’s a yard. It’s a small yard. We know we’re not sitting on rolling acres of farmland here, but we are going to make the most of what we have. Please enjoy our journey into urban gardening and homesteading as we attempt to grow our own food and eat it for the whole year, raise animals, make some of our own toiletries, and maybe even our own clothes. We’ll see how it goes. I expect a lot of trial and error, some what not to do, and a few recipes along the way. Again, welcome to our yard.